The Rise of Assistants
In last couple of years we have seen the rise of assistants, AI is enabling our lives more and more and with help of devices like Google Home and Amazon Echo, its now entering our living rooms and changing how we interact with technology. Though Assistants have been around for couple of years through android google home app, the UX is changing rapidly with home devices where now we are experiencing Conversational UI i.e. being able to talk to devices, no more typing/searching, you can now converse with your device and book a cab or play your favourite music. Though the verdict on home devices like Echo and Google home is pending, the underlying technology i.e. AI based assistants are here to stay.
In this post, we will explore Google Assistant Developer framework and how we can integrate it with Drupal.

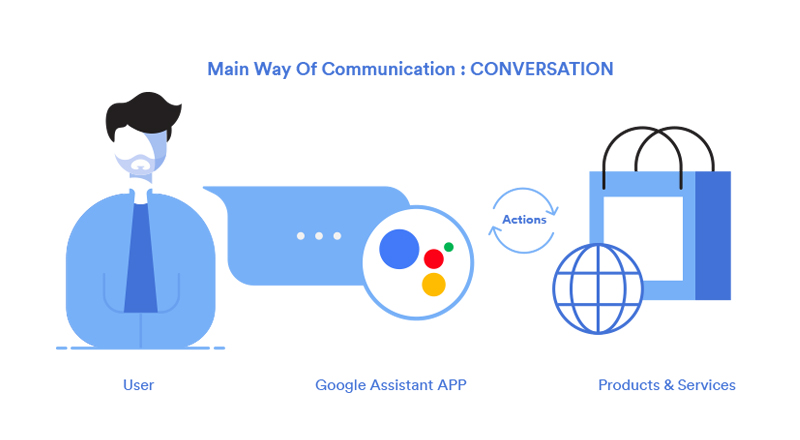
Google Assistant works with help of Apps that define actions which in turn invokes operations to be performed on our product and services. These apps are registered with Actions on Google, which basically is a platform comprising of Apps and hence connecting different products and services via Apps. Unlike traditional mobile or desktop apps, users interact with Assistant apps through a conversation, natural-sounding back and forth exchanges (voice or text) and not traditional Click and Touch paradigms.
The first step in the flow is understanding use requests through actions, so lets learn more about it.
How Action on Google works with the Assistant?
It is very important to understand how actually actions on Google work with the assistant to have an overview of the workflow. From the development perspective, it's crucial we understand the whole of the Google Assistant and Google Action model in total, so that extending the same becomes easier.

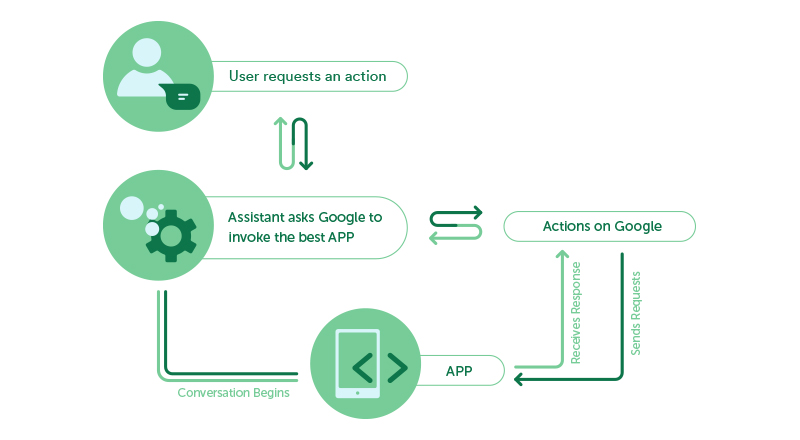
It all starts with User requesting an action, followed by Google Assistant invoking best corresponding APP using Actions on Google. Now, it's the duty of Actions on Google to contact APP by sending a request. The app must be prepared to handle the request, perform the corresponding action and send a valid response to the Actions on Google which is then passed to Google Assistant. Google Assistant renders the response in its UI and displays it to the user and conversation begins.
Lets build our own action, following tools are required:
- Ngrok - Local web server supporting HTTPS.
- Editor - Sublime/PHPStorm
- Google Pixel 2 - Just kidding! Although you can order 1 for me :p
- Bit of patience and 100% attention
STEP1: BUILD YOUR ACTION APP
Very first step now is building our Actions on Google APP. Google provides 3 ways to accomplish this:
- With Templates
- With Dialogflow
- With Actions SDK
Main purpose of this app would be matching user request with an action. For now, we would be going with Dialogflow (for beginner convenience). To develop with Dialogflow, we first need to create an Actions on Google developer project and a Dialogflow agent. Having a project allows us to access the developer console to manage and distribute our app.
- Go to the Actions on Google Developer Console.
- Click on Add Project, enter YourAppName for the project name, and click Create Project.
- In the Overview screen, click BUILD on the Dialogflow card and then CREATE ACTIONS ON Dialogflow to start building actions.
- The Dialogflow console appears with information automatically populated in an agent. Click Save to save the agent.
Post saving an agent, we start improving/developing our agent. We can consider this step as training of our newly created Agent via some training data set. These structured training data sets referred here are intents. An individual Intent comprises of query patterns that a user may ask to perform an action, events and actions associated with this particular intent which together define a purpose user want to fulfill. So, every task user wants Assistant to perform is actually mapped with an intent. Events and Actions can be considered as a definitive representation of the actual associated event and task that needs to be performed which will be used by our products and services to understand what the end user is asking for.
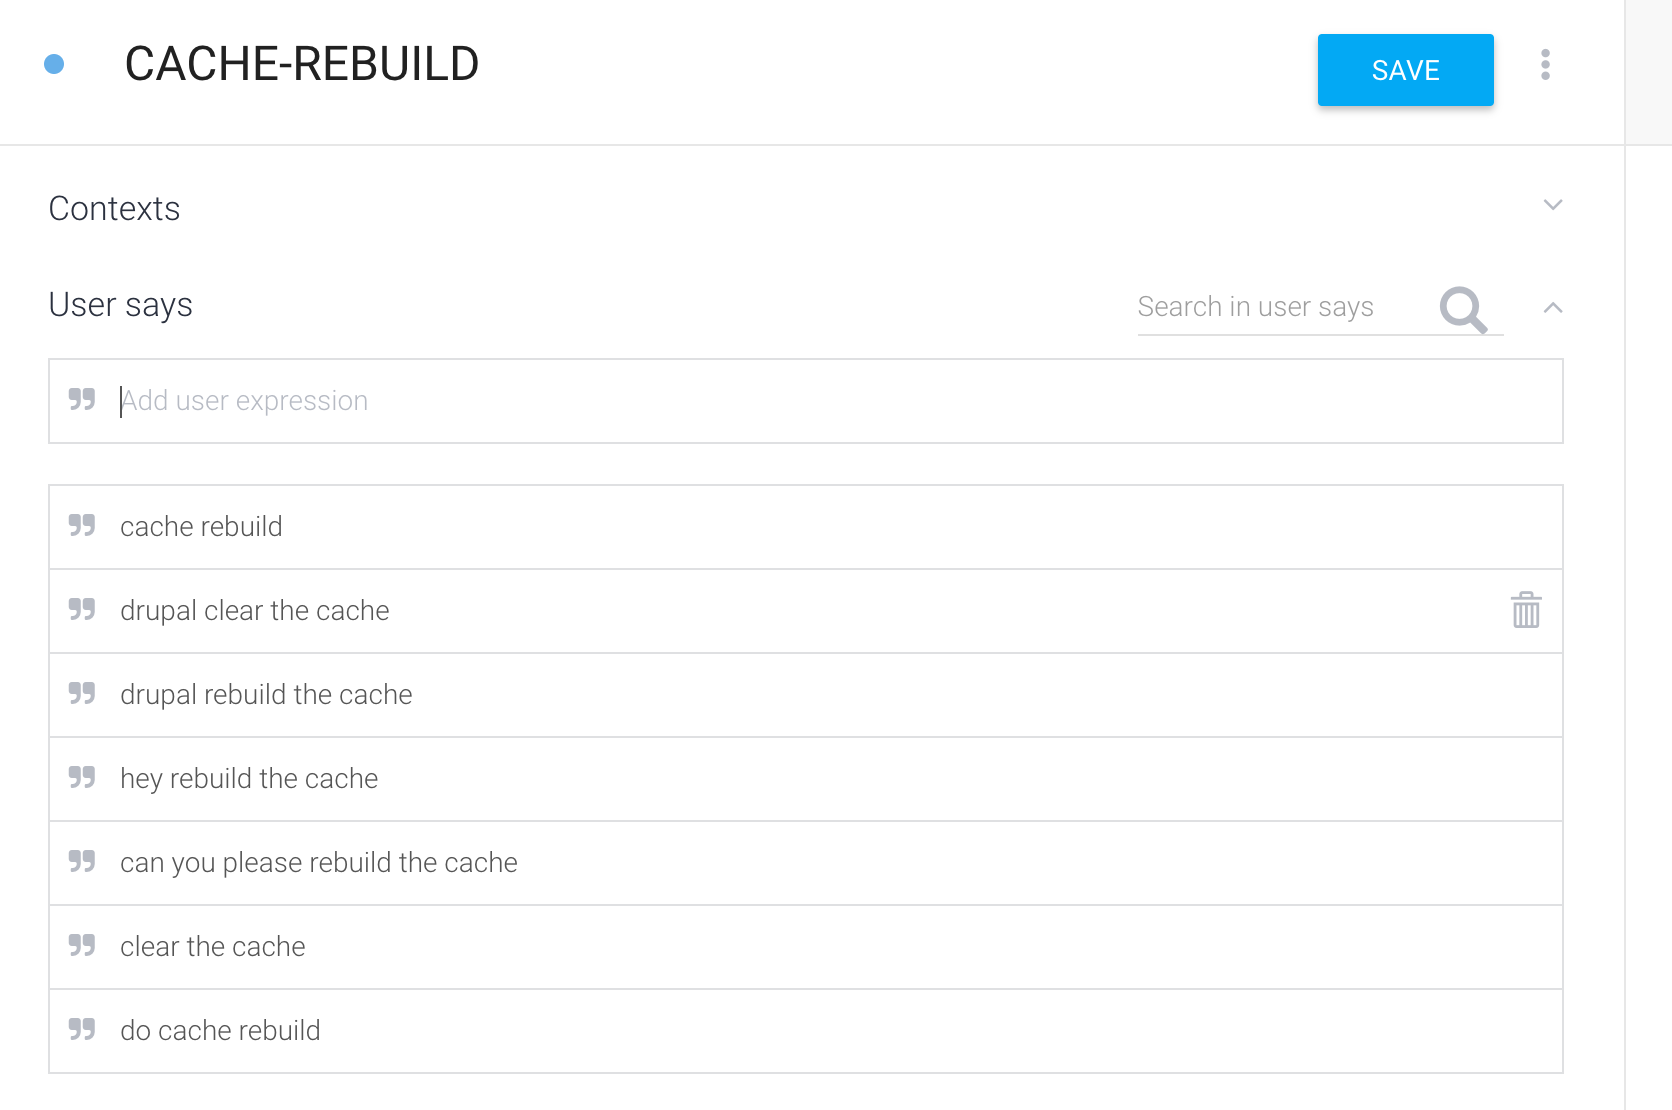
So, here we define all the intents that define our app. Let's start with creating an intent to do cache rebuild.
- Create a new intent with name CACHE-REBUILD.
- We need to add query patterns we can think of, that user might say to invoke this intent. (Query Patterns may content parameters too, we will cover this later.)
- Add event cache-rebuild.
- Save the intent.

For now, this is enough to just understand the flow, we will focus on entities and other aspects later. To verify if the intent you have created gets invoked if user says “do cache rebuild”, use “Try it now” present in the right side of the Dialogflow window.
STEP2: BUILD FULFILLMENT
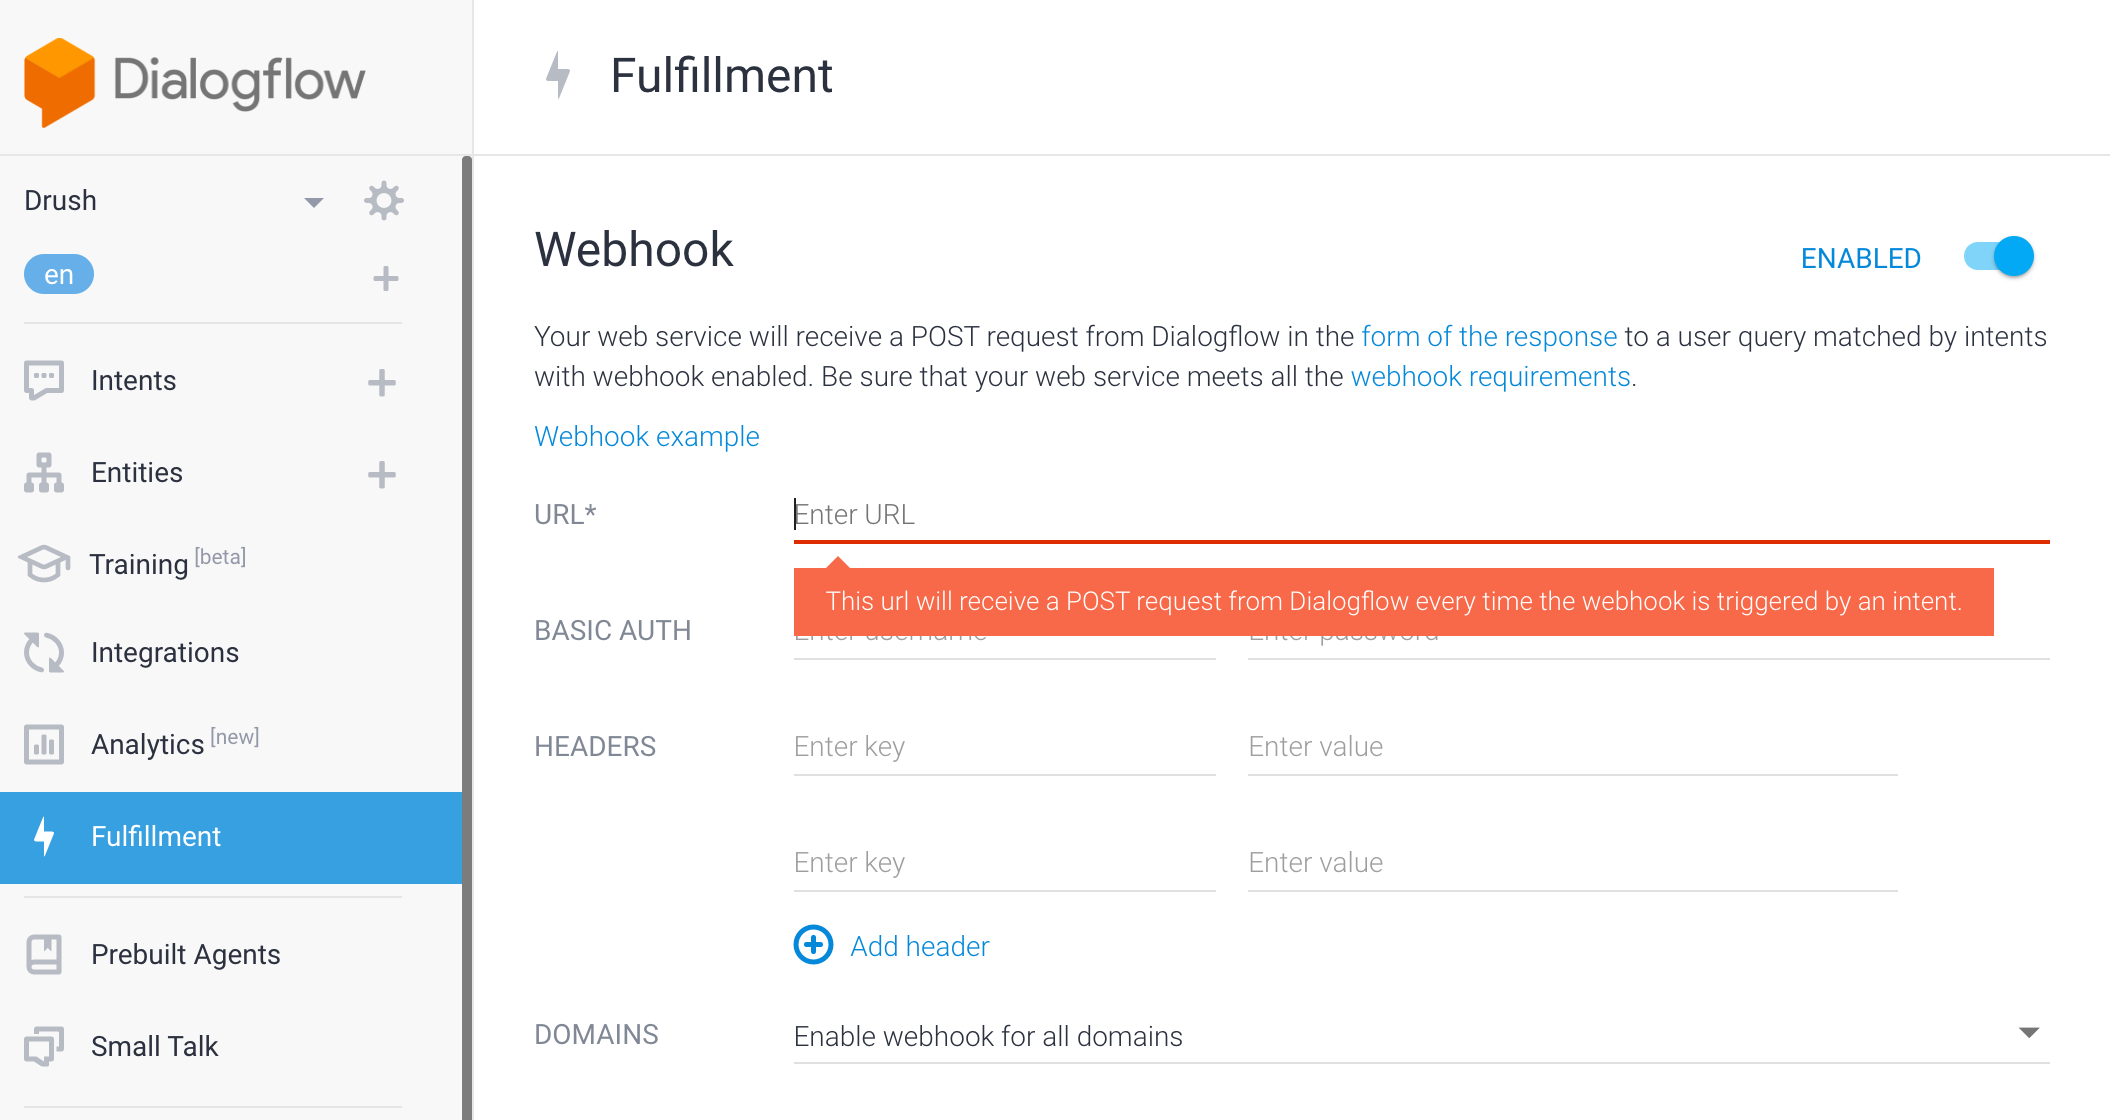
After we are done with defining action in dialogflow, we now need to prepare our product (Drupal App) to fulfill the user request. So, basically after understanding user request and matching that with an intent and action Actions on Google is now going to invoke our Drupal App in one or the other way . This is accomplished using WEBHOOKS. So, Google is now going to send a post request with all the details. Under Fulfillment tab, we configure our webhook. We need to ensure that our web service fulfills webhook requirements.
According to this, the web service must use HTTPS and the URL must be publicly accessible and hence we need to install NGROK. Ngrok exposes local web server to the internet.

After having a publicly accessible URL, we just need to add this URL under fulfillment tab. As this URL will receive post request and processing will be done thereafter, so we need to add that URL where we are gonna handle requests just like endpoints. (It may be like http://yourlocalsite.ngrok.io/google-assistant-request)

Now, we need to build corresponding fulfillment to process the intent.
OK! It seems simple we just need to create a custom module with a route and a controller to handle the request. Indeed it is simple, only important point is understanding the flow which we understood above.
So, why are we waiting? Let’s start.
Create a custom module and a routing file:
Now, let’s add the corresponding controller
Done! We are ready with a request handler to process the request that will be made by Google Assistant.
STEP3: DEPLOY FULFILLMENT AND TESTING THE APP
Part of the deployment has already been done, as we are developing on our local only. Now, we need to enable our custom module. Post that let's get back to dialogflow and establish the connection with app to test this. Earlier we had configured fulfillment URL details, ensure we have enabled webhook for all domains.

Let’s get back to intent that we build and enable webhook there too and save the intent.

Now, to test this we need to integrate it any of the device or live/sandbox app. Under Integrations tab, google provides several options for this too. Enable for Web Demo and open the URL in new tab, to test this:

Speak up and test your newly build APP and let Google Assistant do its work.
So, as seen in the screenshot, there can be 2 type of responses. First, where our server is not able to handle request properly and the second one where Drupal server sends a valid JSON response.
GREAT! Connection is now established, you can now add intents in Google Action APP and correspondingly handle that intent and action at Drupal End. This is just a taste, conversational UX and Assistant technology will definitely impact how we interact with technology and we believe Drupal has a great role to play as a robust backend.

