
.avif)
Routing is a core aspect of web development, enabling smooth navigation across pages within an application. This article focuses on introducing a powerful new feature: the App Router in Next.js 14. This addition aims to enhance the way developers manage routing and navigation in their applications.
In this blog, we will explore the App Router concept, its benefits, and how to implement it using code snippets.
Project Set-up
To get started, create a new Next.js project with the latest version using the below commands:
npx create-next-app@latest my-next-app
cd my-next-app
npm run dev
Open the code in your preferred code editor and navigate to the src folder. For a clean start, delete the app folder to begin setting up routes from the ground up.
Getting Started with Routing
Next.js has a file-system-based routing system built on concepts of files and folders. When a file is named page.js or page.tsx is added to the app directory which is present in the src directory, it's automatically available as a route. We will learn more about routing below:
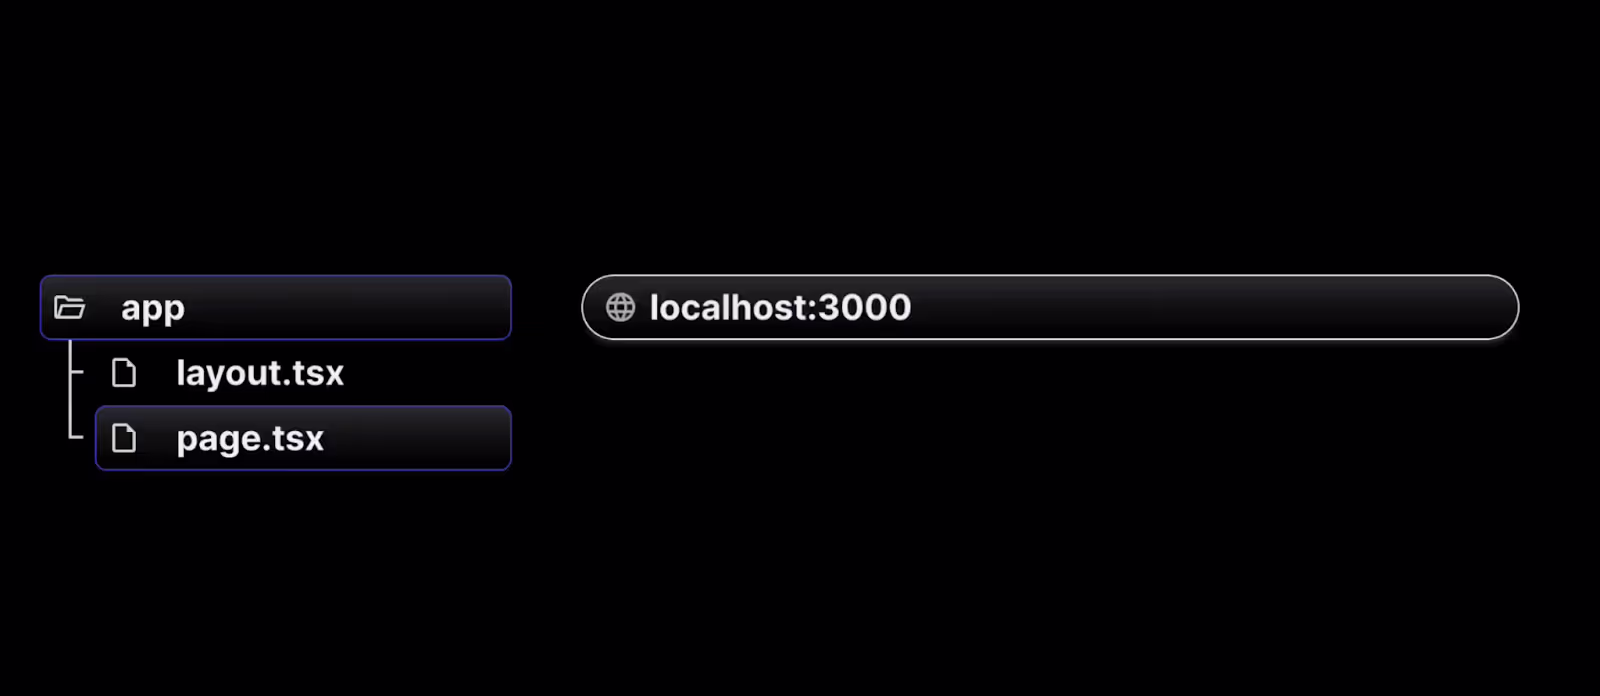
1. Creating a root route
To set up a route, follow the below steps:
- Create a folder named app (the name of the folder should be app as per Next.js convention ) inside the src directory.
- Inside the app folder, add a page.tsx/page.js file, which will define the route.
- In the page.tsx/page.js file, write a simple React component to represent the "Home" page.
- Not all files within the app directory are considered routes. Only files named page.tsx or page.js are treated as routes.
// src/app/page.js
export default function Home() {
  return <h1>Welcome home!</h1>;
}
Navigate to localhost:3000 in the browser by running the npm run dev command. The above page is treated as the route for the root URL (localhost:3000) and we can see Welcome home! message in the browser.
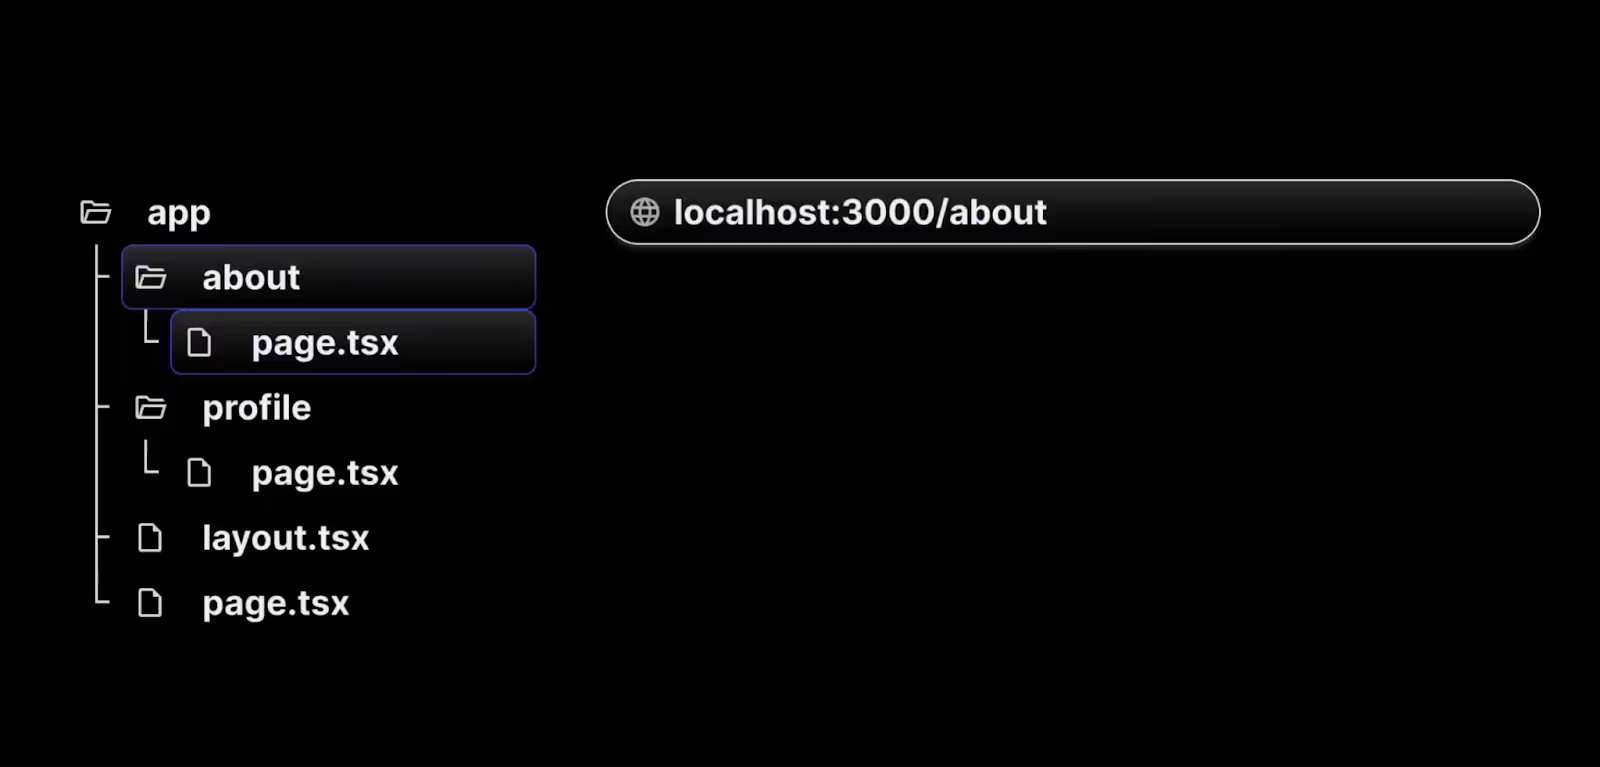
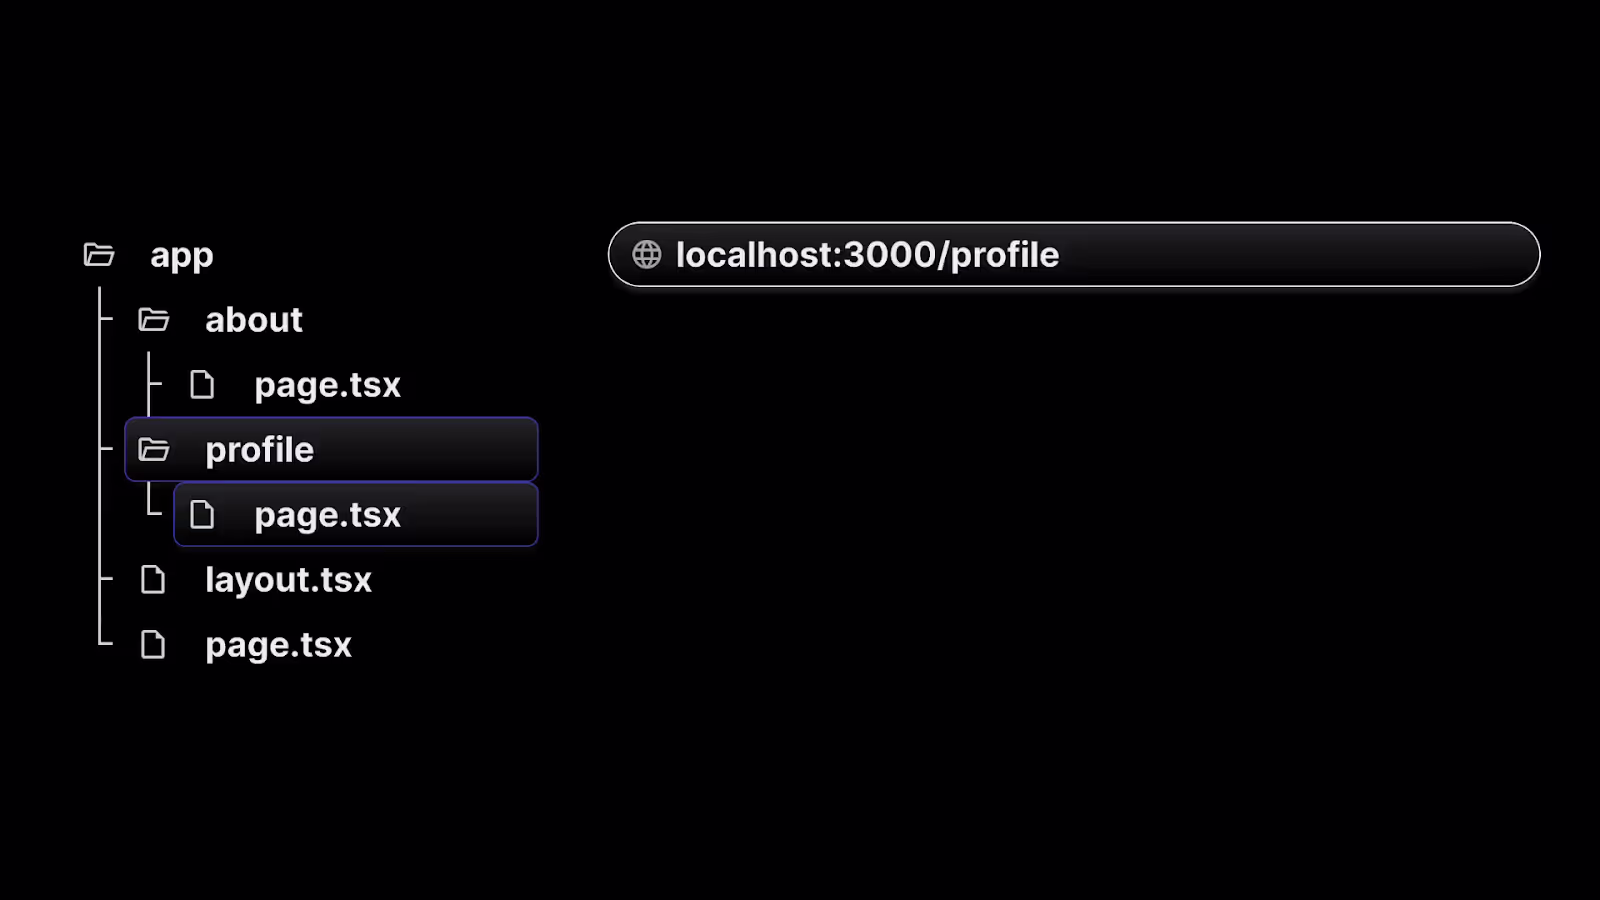
2. Creating additional routes
To create more additional routes for /about and /profile , follow the below steps.
- Create a folder named about inside the app directory.
- Inside the about folder, add a page.tsx/page.js file, which will define the route.
- In the page.tsx/page.js file, write a simple React component to represent the "About" page.
- Not all files within the about directory are considered routes. Only files named page.tsx or page.js are treated as routes.
// src/app/about/page.js

export default function About() {
  return <h1>About me</h1>;
}
9. Similarly create a folder inside the app directory as a profile.
10. Add corresponding page.tsx or page.js to represent /profile route component.
// src/app/profile/page.js

export default function Profile() {
  return <h1>My profile</h1>;
}
When you visit the root URL, localhost:3000, the home page will appear as expected. However, if you go to localhost:3000/about, the "About me" page will be displayed. Likewise, navigating to /profile will show the "My profile" page.
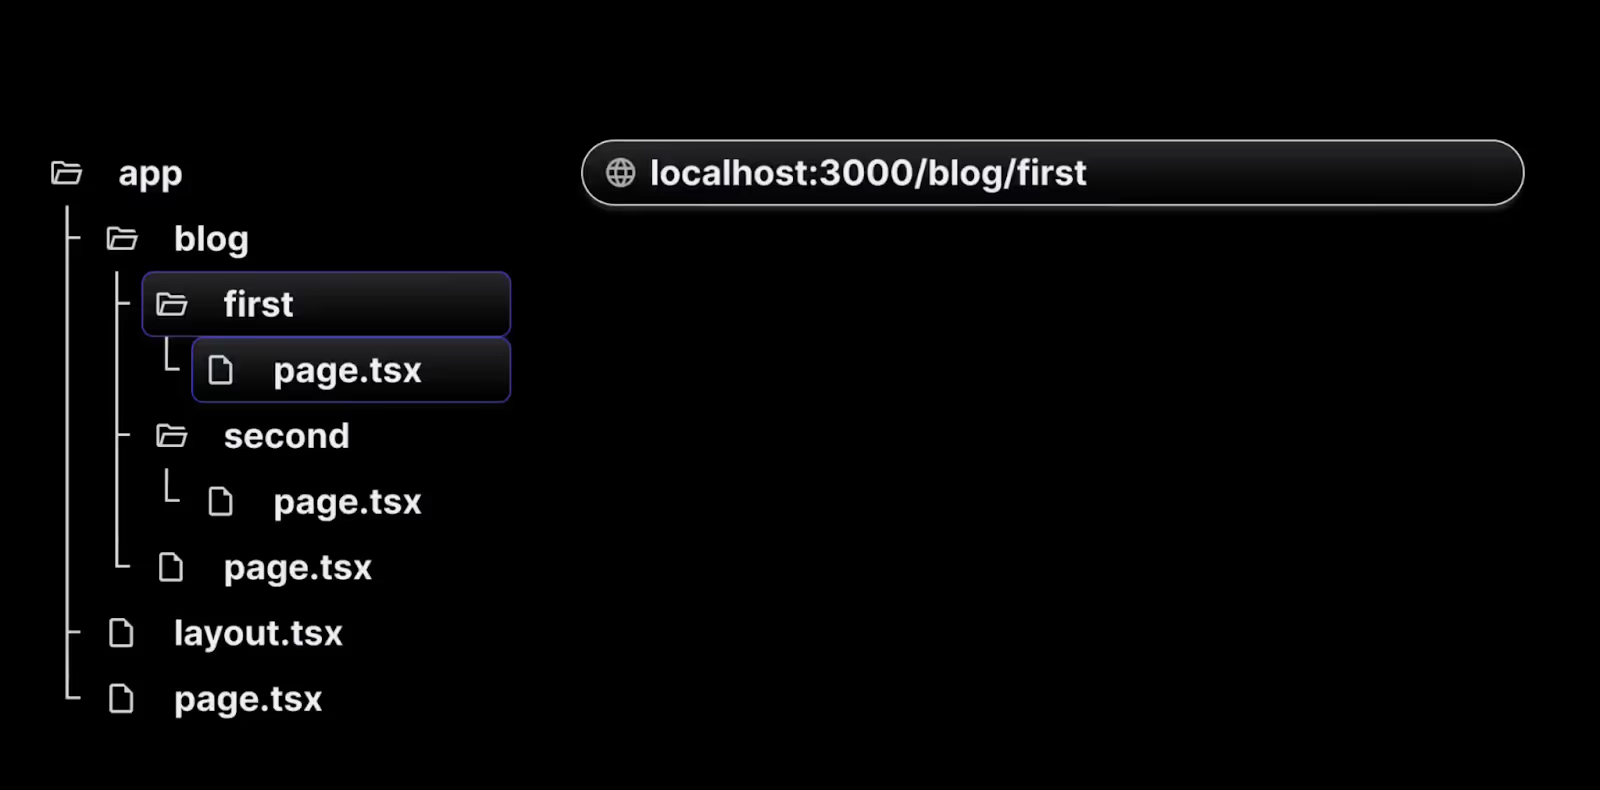
3. Nested routes
To create a nested route, you can nest folders inside each other. For example, you can add a new /blog/first route by nesting two new folders in the app directory.
The /blog/first route is composed of three segments:
- / ------ (Root segment)
- blog —--- (Segment)
- first —--- (Leaf segment)
To create nested above routes, follow the below steps.
- Create a folder named a blog inside the app directory.
- Inside the blog folder, add a page.tsx/page.js file, which will define the route /blog.
// src/app/blog/page.js

export default function Blog() {
  return <h1>My blog</h1>;
}
- Now inside the blog folder create folder names as first ,where adding page.tsx/page.js file,and writing a simple React component to represent the “/blog/first” page.
// src/app/blog/first/page.js

export default function FirstBlog() {
  return <h1>First blog post</h1>;
}
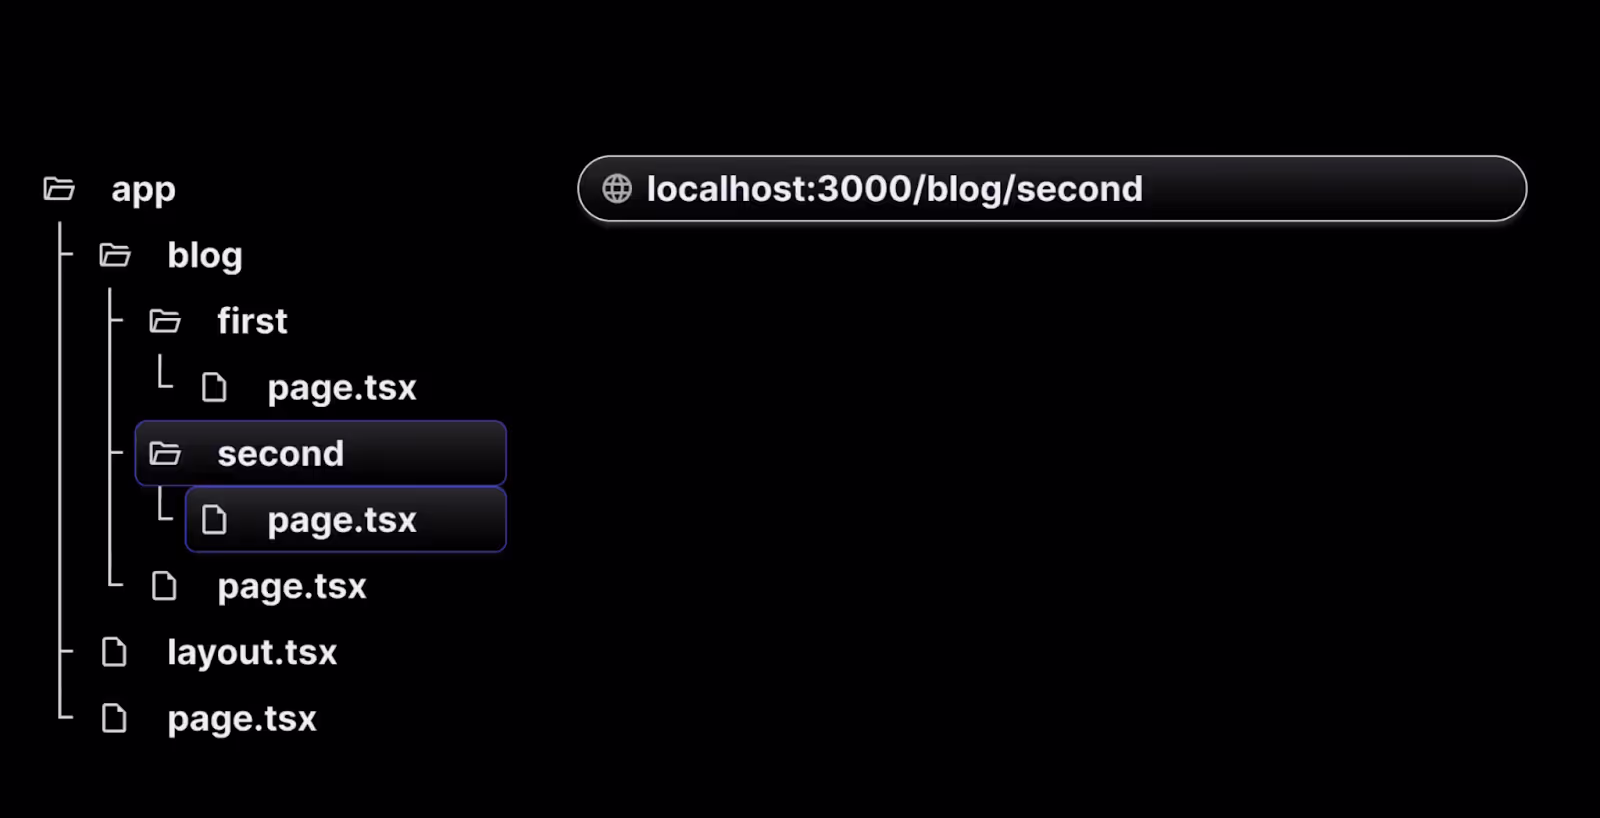
Now navigating to localhost:3000/blog , the blog page will be displayed. However, if you navigate to localhost:3000/blog/first, you will see the First Blog page. Similarly, we can create localhost:3000/blog/second or localhost:3000/blog/third and so on by creating nested folders inside the blog folder as above.

In a complex application with hundreds of blogs, manually creating routes for each blog can become cumbersome and impractical. To address this, dynamic routes offer a more efficient solution.
4. Dynamic routes
To create dynamic routes, follow below steps:
- Create a src/app/products folder.
- Inside the products folder, create a page.tsx/page.js file to display a list of three products.
// src/app/products/page.js

export default function ProductList() {
  return (
    <>
      <h1>Product List</h1>
      <h2>Product 1</h2>
      <h2>Product 2</h2>
      <h2>Product 3</h2>
    </>
  );
}
When you navigate to localhost:3000/products in your browser, a list of products will be displayed. To create a details page for each product, follow these steps:
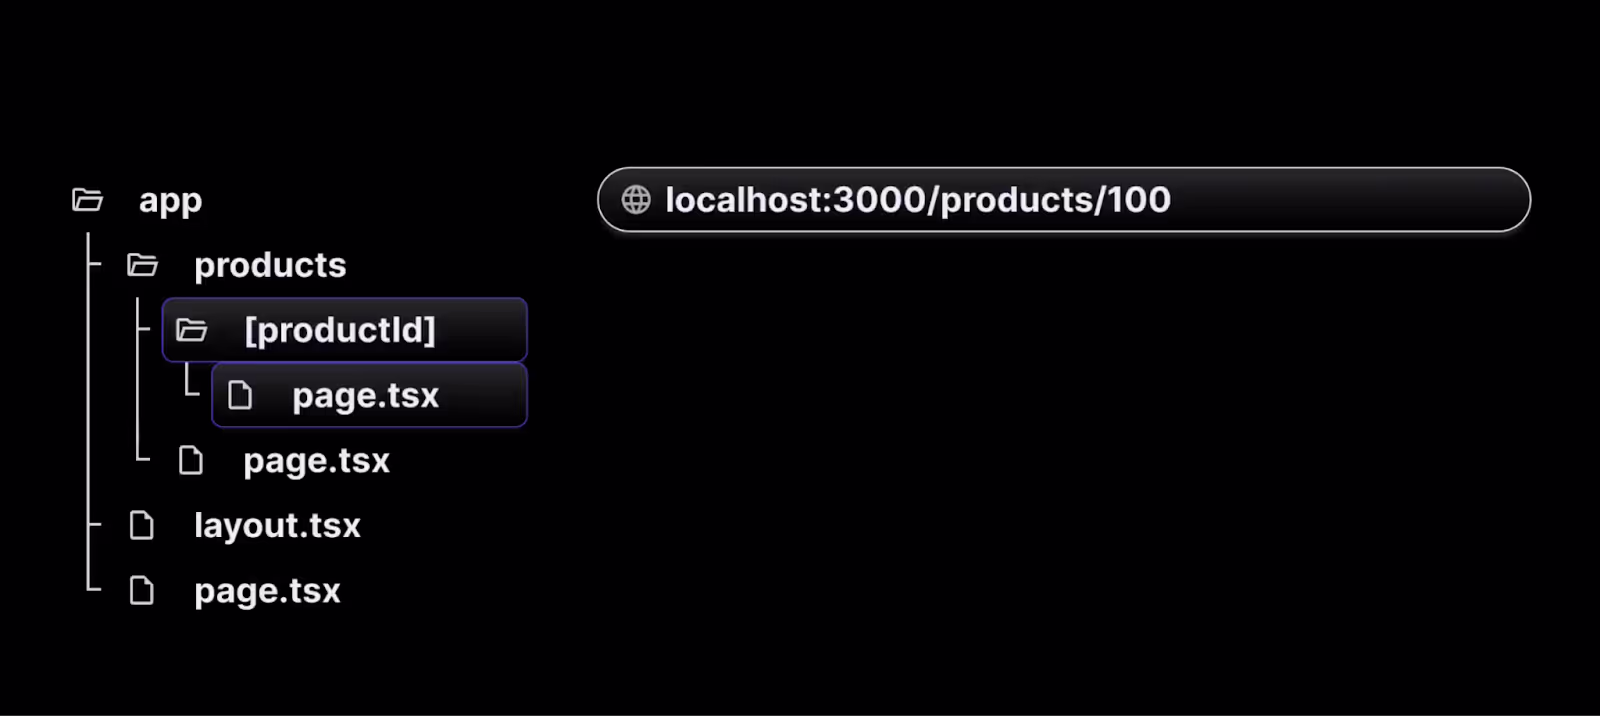
- Within the products folder, create a new folder called [productId]. The square brackets indicate a dynamic route segment.
- Inside the [productId] folder, add a page.js file with the following code:
// src/app/products/[productId]/page.js

export default function ProductDetail() {
  return <h1>Details about the product</h1>;
}
- Now, when you visit localhost:3000/products/1, you'll see the product details page. Similarly, visiting URLs like /products/2, /products/3, or /products/100 will render the same details page. The [productId] folder acts as a dynamic route segment that can handle different values such as 1, 2, 3, etc.
- To display the specific product ID, use the params object, which is accessible on every page. Update the component like this:
// src/app/products/[productId]/page.js

export default function ProductDetail({
  params,
}) {
  return <h1>Details about product {params.productId}</h1>;
}
- Now, when you navigate to localhost:3000/products/1, the page will show details for product 1.
- Similarly, visiting /products/100 will display details for product 100.
Dynamic routes are especially useful when implementing the list-detail pattern in UI applications. Understanding how to create dynamic routes in Next.js allows you to build adaptable and scalable applications that handle a wide range of user interactions.
5. Nested Dynamic routes
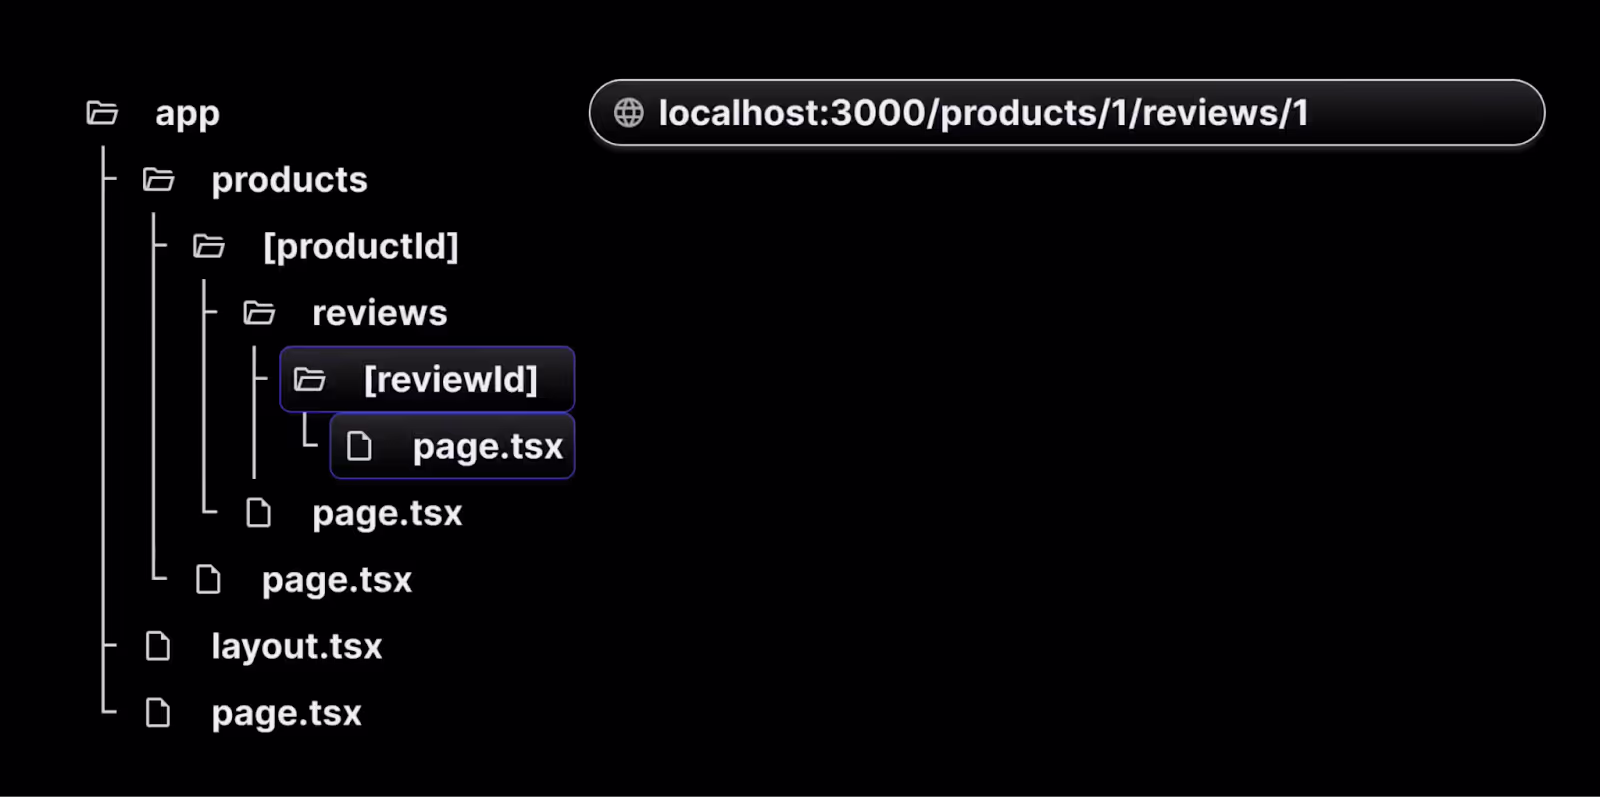
- Complex applications often require multiple dynamic route segments. For instance, when navigating to /products/1, the user expects to see the details for product 1.
- Similarly, visiting /products/1000/reviews/1 should display the first review of a product with productId1000.
- This can be achieved by creating a folder inside the [productId] folder with the name as reviews.
- Creating page.js file inside reviews folder will route to localhost:3000/products/[productId]/reviews
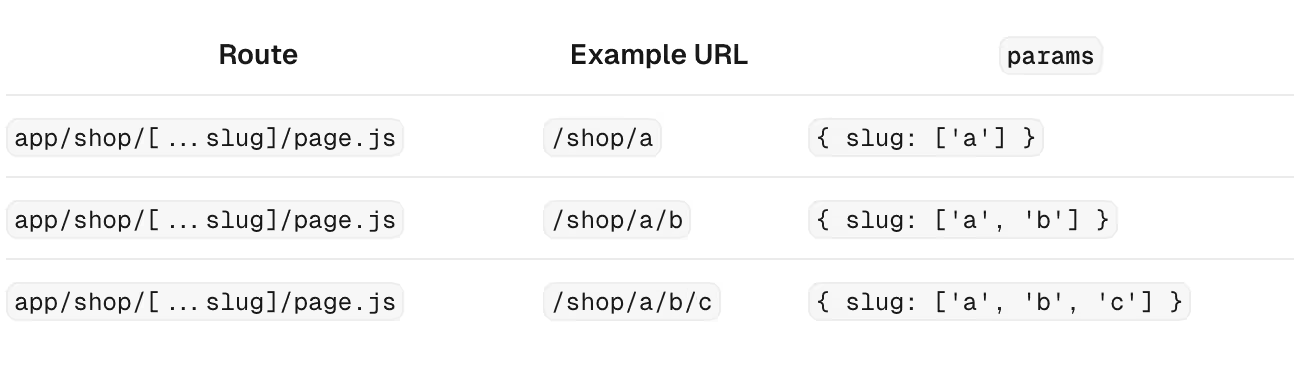
- Creating a page.js file inside the [reviewId] folder which is present inside reviews folder we can catch all the reviews of all products . See the visual representation below to understand more.

In more complex applications, where you need to display a list of product categories and each category's details, you can use the same dynamic route approach as for product reviews.
However, if the number of subfolders increases significantly for each product, manually creating folders for every category and subcategory can become overly complicated and inefficient.These can be overcome by catching all routes.
6. Catch all routes
Next.js offers the catch-all segments feature, enabling flexible routing. For example, if you want to create a documentation site with multiple features and concepts, where each concept has its own route, you don't need to create separate files for each route. Instead, you can use the catch-all segments route.
To implement catch-all segments, follow below steps:
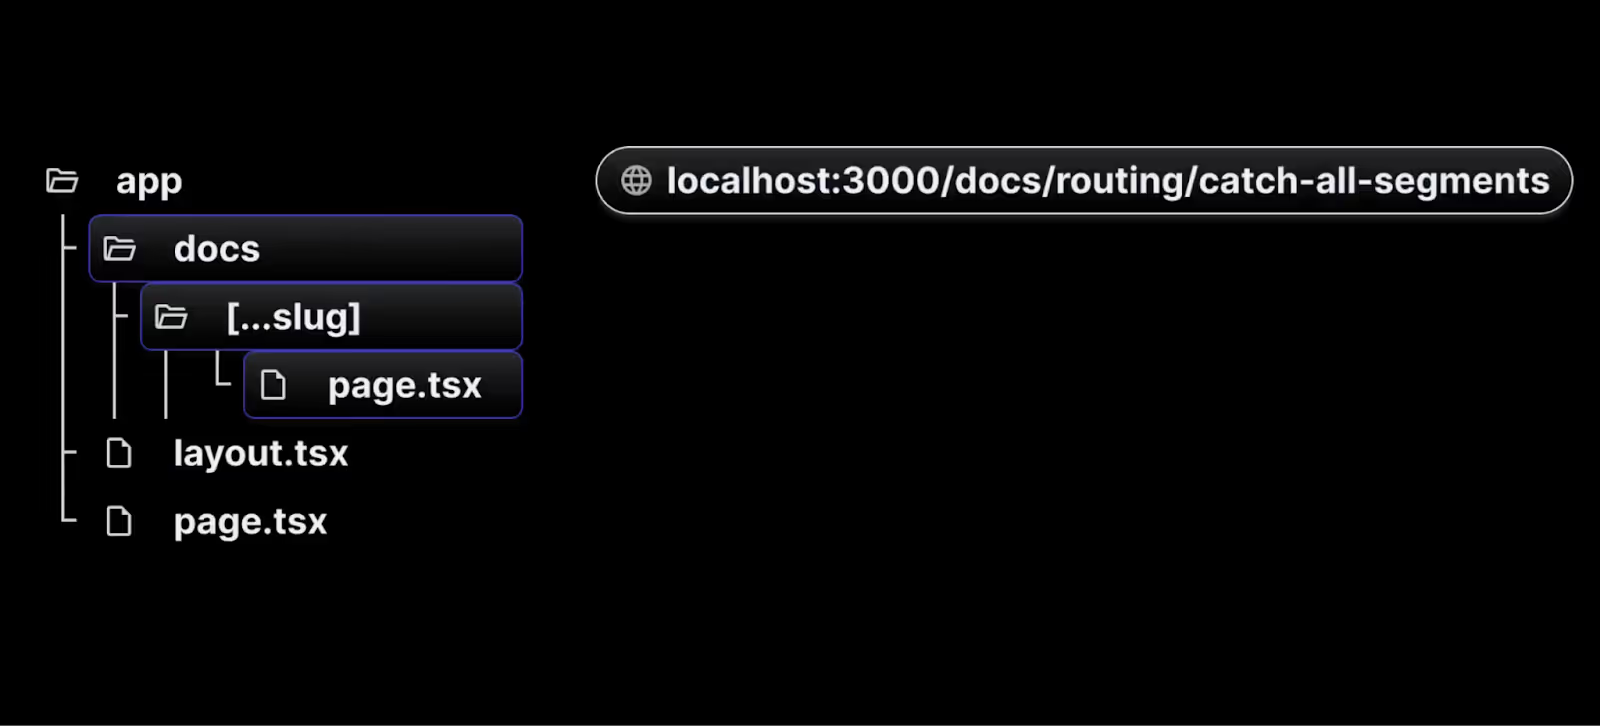
- Create a src/app/docs folder and create page.tsx/page.ts.
// src/app/docs/page.js

export default function Doc() {
  return <h1>Docs home page</h1>;
}
- Inside the docs folder, create a new folder with a special name recognized by Next.js. Use square brackets and three dots (e.g., [...slug]) to define a dynamic segment.
- Within the [...slug] folder, create a page.tsx/page.ts file that contains a basic React component to represent the documentation home page.
- With this structure, the page.tsx/page.ts file will match any URL containing the /docs segment, allowing you to manage all route segments using a single file.
- To access the individual segments in the URL, you can use the params object provided by Next.js. For instance, visiting localhost:3000/docs/routing/catch-all-segments can render the following component:
// src/app/docs/[...slug]/page.js

export default function Doc({ params }) {
  if (params.slug.length === 2) {
    return (
      <h1>
        Viewing docs for feature {params.slug[0]} and concept {params.slug[1]}
      </h1>
    );
  } else if (params.slug.length === 1) {
    return <h1>Viewing docs for feature {params.slug[0]}</h1>;
  }
  return <h1>Docs home page</h1>;
}
Benefits of the App Router
Improved Organization
The App Router allows for a clear and organized project structure, making it easier to manage and navigate through complex applications.
Enhanced Reusability
With shared layouts, you can define components once and reuse them across multiple routes, reducing redundancy and improving maintainability.
Better Performance
The App Router is optimized for performance, ensuring fast page loads and smooth navigation experiences.
Conclusion
The App Router in Next.js 14 is a significant enhancement for developers looking to build scalable, organized, and high-performance applications.
By utilizing nested routes, route groups, and advanced layouts, you can create more maintainable code and deliver a better user experience.
Try integrating the App Router in your next Next.js project and experience the benefits firsthand!
For more detailed information, you can refer to the official Next.js documentation.